Maker Feature: Yellow Bouquet Yuzu Coat by Nancy Chen Bajraktari

Yellow Bouquet Textile Waffle Patterns Yuzu Coat
Written by Nancy Chen Bajraktari with photos by Nancy and her son, Art B.
Sewing and finishing this quilted coat is like the fulfillment of a sewing fairy tale for me! Once upon a time, about 2 years ago, before I started sewing clothes, I caught a glimpse of someone entering the building where I worked with a beautiful floral puffer coat. I only saw her from a distance but from then on I dreamed of having one. I was actually able to find that exact coat for sale online but it had terrible reviews, criticizing the fit and quality. It was expensive so I decided to let the idea go. It didn’t cross my mind that I could make a coat because all the sewing I was able to do at the time was hemming pants and the like.
Fast forward two years. I now have about 1.5 years of hardcore sewing under my belt, thanks to the pandemic. I’ve learned how to sew most blouses, dresses, and bottoms proficiently, and I’d rate myself as an intermediate level sewist (barely). I had Julia Allisson Cost’s Yellow Bouquet Cotton Poplin in my stash, which was beloved, but I had never felt settled about what to do with this beautiful fabric. I knew it had to be something special, and no project I could conceive felt special enough for it. When I started seeing other sewists’ quilted coats and dresses popping up on Instagram, it got the urge to make one of my own and it became apparent that I could make a quilted coat with the poplin. I needed a coat for an upcoming cold-weather vacation so it was perfect. (I live in Hawai’i and don’t normally need a coat.) It felt right and I got to work in early December!
I asked around and also did some skimming of guides on the internet for how to make a quilted coat. Here are some patterns drafted specifically for sewing a quilted coat or jacket:
Grainline Studio Tamarack Jacket, Fibre Mood Quilted Molly Jacket, Fibre Mood Giselle Jacket, Megan Nielsen Hovea Quilted Coat, Muna and Broad Grainger Coat (fits 64+ inch bust)
There is not just one single way to make one, but this blog post is about how I made one using a coat pattern that is NOT drafted to be a quilted coat. I was looking for a coat pattern in a longer length with an asymmetrical closure, hood, and raglan sleeves, and since I couldn’t find that style in a pattern meant specifically for quilted material, I chose the Waffle Patterns Yuzu Coat pattern. Yuki, the pattern designer, also made up a ‘padded’ version of the Yuzu coat that helped me visualize what a quilted version might look like.
If you’re here for a broad summary, here’s what I did: I quilted the poplin fabric to the batting and made an entire outer shell. Then, instead of sewing the facing and lining as the pattern instructs, I made another outer shell out of cotton lawn only. I turned that inside out and put those two shells wrong sides together. I created half a yard’s worth of bias binding and bound up the whole opening with one very long strip of black bias, from the hem to the front opening to the hood, around and back.
I made this coat in European size 36/US size 4. I did not make any alterations to the measurements, although next time I might grade the hips larger. The front closes up slightly askew due to my hips (you can see that the front seams don’t line up perfectly in the final photos), although this doesn’t bother me. This is just my particular body, so as always, check the measurements and grade as necessary.
Ok let’s talk details and I’ll include some photos of my process. I never meant for these photos to be seen publicly so please excuse the poor lighting, messy backgrounds, and peeks of my feet here and there!
First, I cut out all of the outside shell pattern pieces out of the cotton poplin. I chose to include 2 layers of batting because one layer seemed too thin. I cut the batting pieces a little larger than the poplin in case there was shifting during the quilting process. Looking back, I’m not sure it was entirely necessary to cut the batting pieces larger, but maybe I was able to take that safeguard for granted. There were a lot of pieces and I wanted to be able to see them all as I worked so I could be sure I wasn’t accidentally cutting duplicate pieces or making other errors, so my disaster of a hobby room became more of a disaster:

I decided to create a ‘V’ quilt stitching pattern on the front and back, which you can see on the back piece:

You can use whatever quilt stitching design you would like— great creative! You should always try to sew the stitches from the center of the fabric to the edges, if possible, to avoid bunching (‘tension waves’). Or in my case, always sew the lines in the same direction. After quilting each individual pattern piece, you can trim the extra batting off the edge of the poplin. After I did all of this quilt stitching, I sewed together both pairs of sleeve pieces so I had one entire right sleeve and one left sleeve, as per the instructions. I sewed the two back pieces together (as you can see above). Finally, I sewed the left front panel and then the right front panel (2 pieces each), which ended up overlapping over each other. Since I chose to include a hood, I sewed the hood pieces together. After sewing these together, I trimmed the batting as close to the seam as possible to reduce unnecessary bulk around the seams, and pressed the seams open. You can also press the seams to one side.
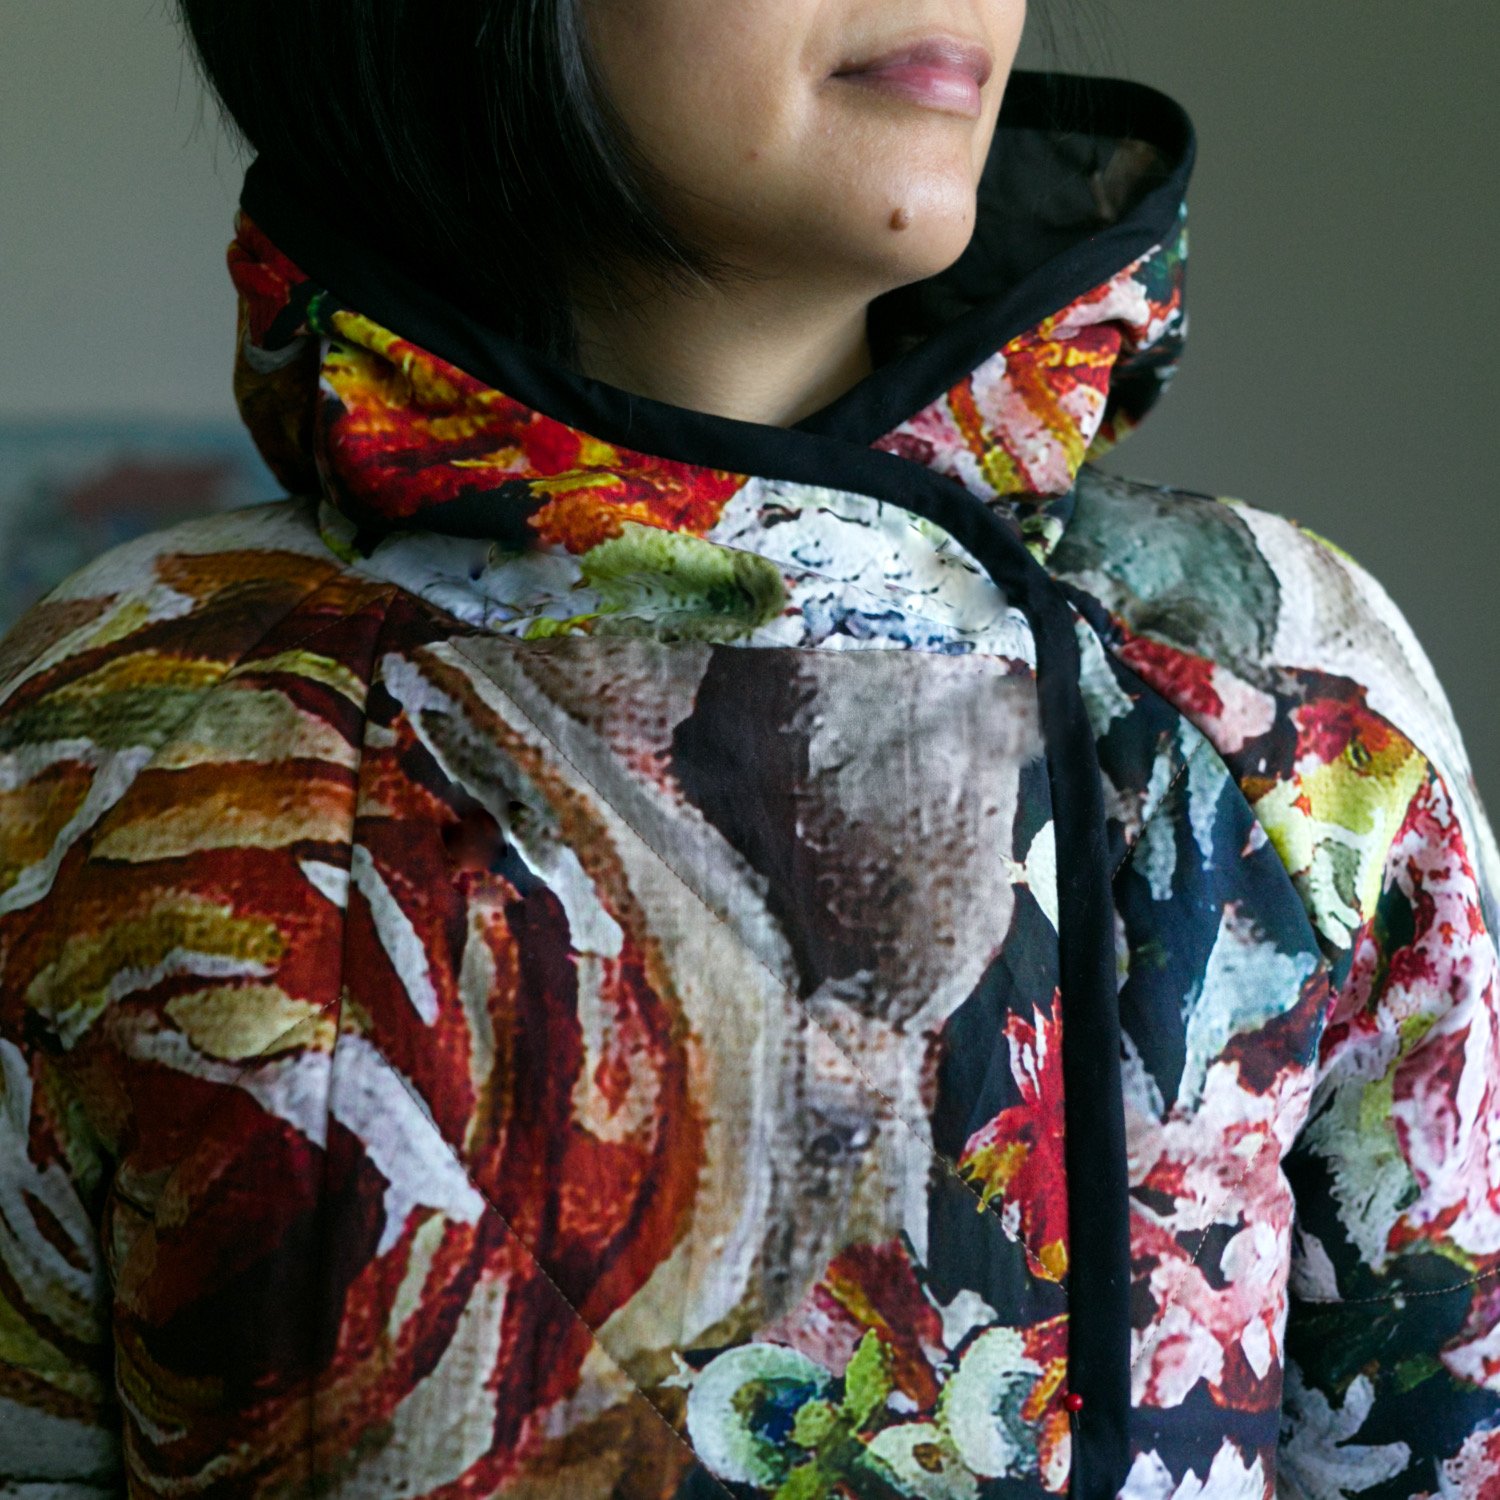
Then it was time to start making it look like a coat. I continued following the instructions regarding the order of assembly. You basically treat your poplin and batting half-sandwich as if it were a single piece of fabric, but you need to make sure to trim the batting as close to the seam allowance as possible whenever you sew two pieces of fabric together. I had some Lady McElroy cotton lawn that had been waiting for a project, so I used that to sew another set of shell pieces. That is to say, I did not use the facing or lining pieces that come with the coat pattern. I made another ‘outside’ layer. That’s because I wanted the coat to be reversible. Two coats in one, score! Also, it saved me the brainpower of trying to figure out how another set of pieces are sewn together. I’m all for shortcuts that don’t hurt my final result. Here’s my coat before I added the binding. I’m surprised how much the strong black border accent added to the garment:

When I finished the inside shell, I inserted it into the outer shell, wrong sides together. I made half a yard’s worth of bias tape using this method on the Seamwork blog. I sewed it starting at the side bottom area (a less conspicuous area), all of the way up through the opening and hood, back down to connect with the original attachment point using one long strip of bias tape. You can also bind the cuffs this way, although I used the pattern instructions to attach them in a different way.
One thing I haven’t talked about yet is how I did the pattern matching with the giant roses, which are a really special, unique, and strikingly beautiful feature of Julia’s Yellow Bouquet print. Any print matching is going to be somewhat approximate since the seam lines are not straight. Although I could have eked by with 2 yards of the fabric for each single side of the shell (so at a very minimum you’ll need 4 to make the outside and inside of this coat if you wear my size), I used 3 yards of her fabric to allow for print/pattern matching the outside. For the rose at the shoulder, I cut the middle of the flower first using the right side front panel. Then I laid that cut out on top of another giant flower in another part of my fabric, and laid the adjacent paper pattern piece over it, slightly overlapping, taking into account seam allowances. This was an eyeballing kind of a thing, not an exact science. After determining where the next pattern piece should be positioned, I removed the previously cut fabric piece and cut out the new pattern piece. Repeat for other pieces. I hope I described this in a way that is understandable. The fabric may not be on the grain as dictated by the pattern when you cut it out. I didn’t find this to affect my sewing or the wearability of the garment, although I did make sure to handle the pattern pieces carefully so they would not warp.
Here are the finished pictures of my coat! I wouldn’t actually say that sewing this coat was challenging; it was mainly just a lot of sewing. Totally worth it though! It feels super soft and cozy.
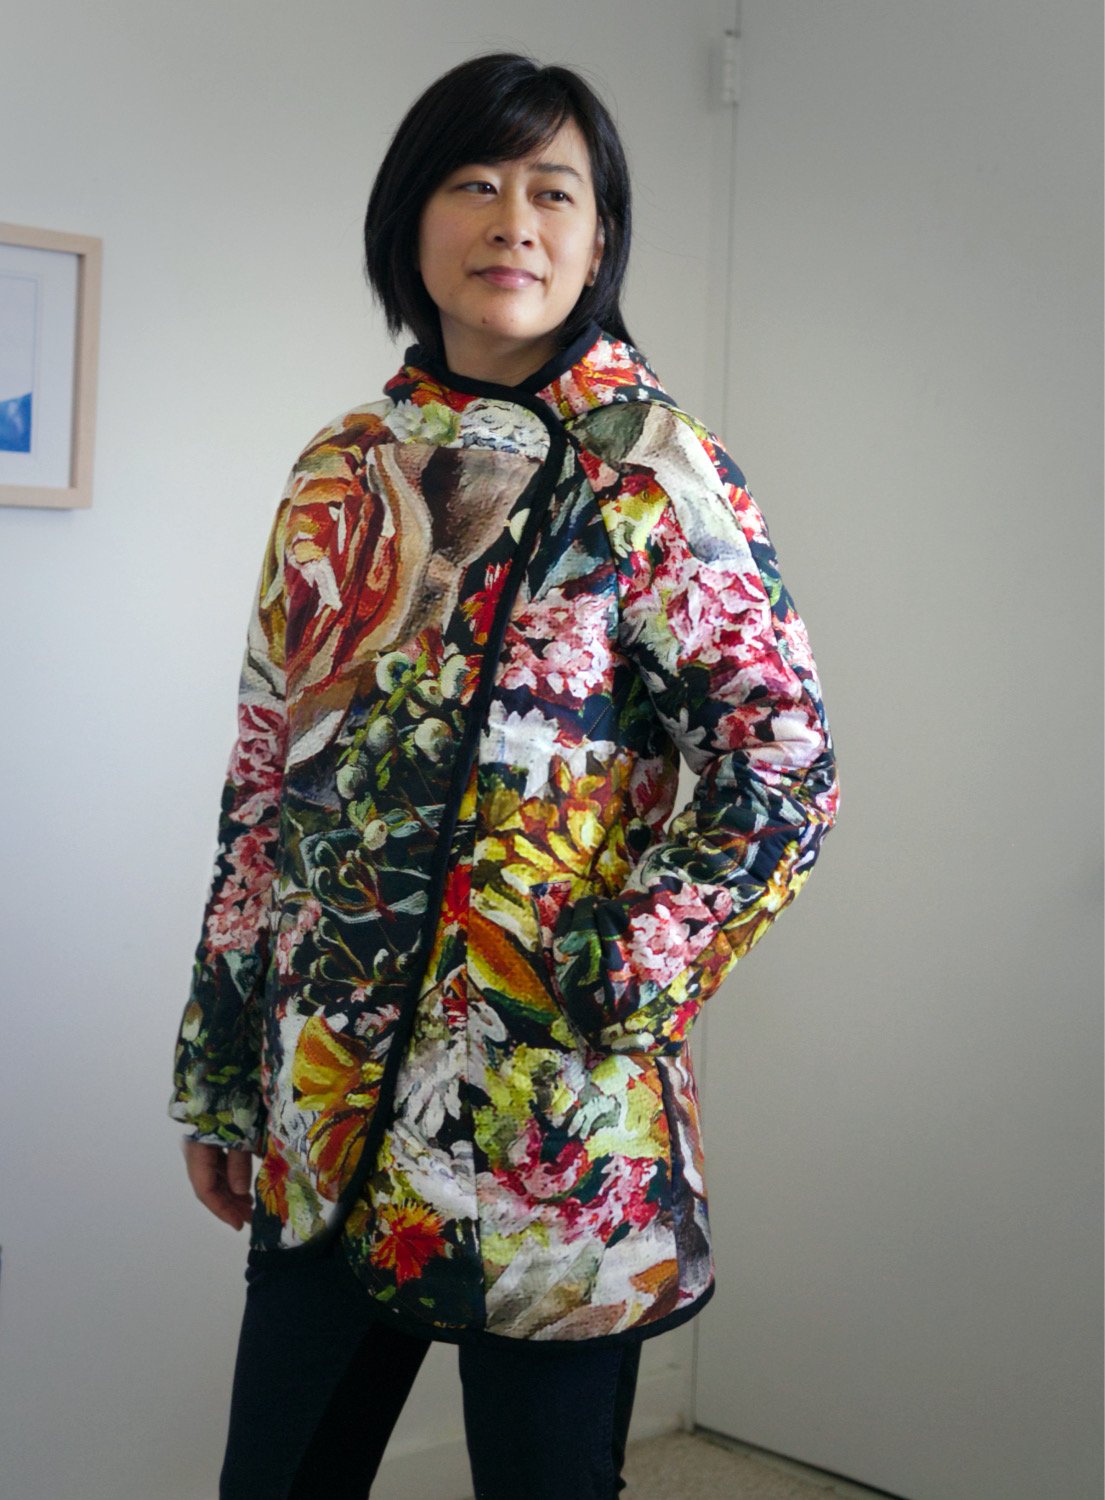


And it ended up keeping me warm on my cold weather trip!


Like any good fairytale ending, my coat and I are living happily ever after!

Many thanks to Nancy for sharing her incredible coat and process story! See all of Nancy’s amazing makes at @iusedtobeacurtain.


